What is a Travel Blog?
Before we dive into creating a travel blog, let’s sort out the basics. A travel blog is a website or page on an online platform on which bloggers share information related to travel. A travel blog can come in a variety of different formats:
- Text
- Video
- Photo
- Audio
- Combined
Many travel bloggers work in a combined format (for example, they launch a website and run an Instagram). This approach allows them to take advantage of each option (for example, driving traffic from Google to their blog, while building a TikTok audience with their videos).
There is no main “format” for a blog; however, the most common form of a blog is a website. This format is one of the oldest, but is no less relevant today. Here are some examples of travel blogs:
The audience of travel bloggers are people who are at least interested in traveling and perhaps planning their own trip. There is an infinite number of such people since, on average, almost every person travels somewhere once a year. However, this is not necessarily a trip to another country (for example, people visit their family on Thanksgiving Day, travel for business, go away for their honeymoon, etc.)
Usually, travel blogs have an audience all year round, although there is some seasonality within the niche:

Part of the audience is not just interested in travel in general, but is looking for travel blogs in particular. Moreover, there are people who are searching for a specific format of travel blogs:
- Solo travelers
- Female travelers
- Family travel
- And others
In the blogging journey of successful bloggers, focusing on a particular niche is often a winning strategy. This is confirmed by the fact that the audience itself often searches for niches as well. Here is an example:
To become a successful travel blogger, it is important to have certain personal qualities that we shared on this page. However, in general, there are no strict limitations on who can and cannot become a travel blogger. If we simplify the guide on how to start a travel blog and make money, the process would only take three steps:
- Create your own website where you will publish content
- Attract an audience
- Earn money as a travel blogger (for example, by using Travelpayouts)
Even though starting a travel blog and making money is not rocket science, with our detailed free guide, you will make the journey from zero to a profitable travel blog much faster.
Free Step-By-Step Guide on Starting a Travel Blog
You might have already heard that you need to buy a domain, set up hosting, design your site, etc.; however, before all of those steps, you have to do the preparatory work. First things first, you should choose the niche of your blog. This is the foundation of your future success.
Step 1 – Choose the Niche of the Future Travel Blog
The experience of other successful bloggers shows that it is better to start a niche website rather than a general site about everything. A niche website is focused on a single topic.
For example, if you live in Texas, your website might be about your state instead of the entire US. This is demonstrated by the experience of Paulina, who launched two sites: a multi-topic site and a niche site. She shares this experience in her story.
The topic of your future travel blog should not be too narrow, as you run the risk of exhausting all your topics in 20-30 articles, at which point the growth of the blog will stop. Here are some examples of niche travel blogs:
- Budget travel in Europe
- Traveling around the US by train
- Traveling with a dog
- Volunteering while traveling
Consider which topics you understand and choose one you would be interested in writing about for a long time. Don’t narrow it down too much to one particular attraction (like Yellowstone), as you’ll quickly hit the traffic ceiling. Travel websites with a super narrow topic could be successful as well, but you might need to create several websites. For a newbie, this strategy is riskier than simply starting one travel blog.
If you are going to reflect the niche of your blog in the name of your website, you must be sure the topic you have chosen will not dramatically change in the future. For example, if you call a project “traveling with a dog”, it will be difficult for you to refocus on solo travel in the future. If, during the initial stage, you are unsure about which topic you would like to prepare content for over a long period of time, you can choose something more universal.
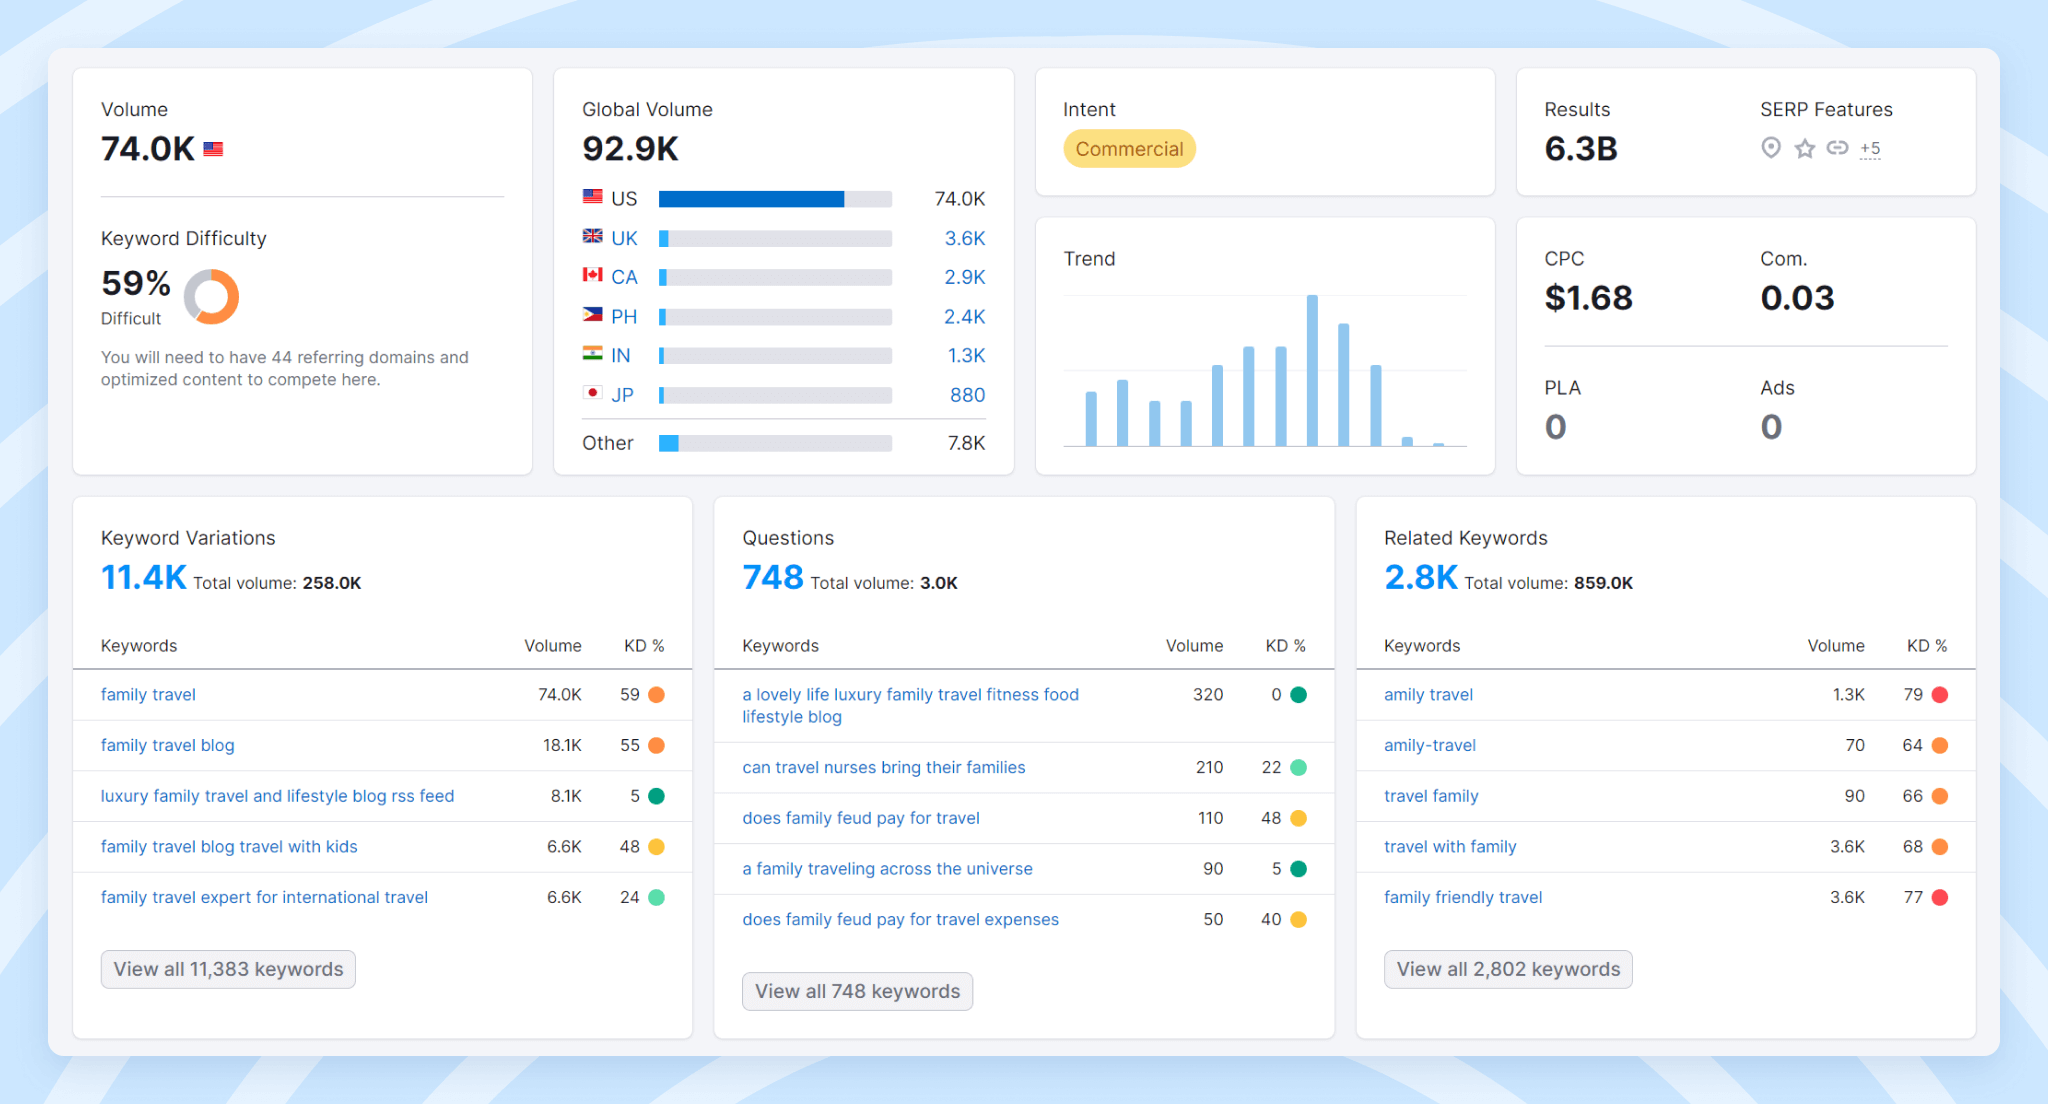
When choosing a topic, it is also important to focus on what is interesting to your audience. This is especially true if you have a lot of ideas at once and can’t choose one. Your future audience’s needs can serve as the answer for which topic you should choose. It is always useful to estimate roughly how many people are looking for the content you are going to prepare. You can use tools for this, such as:
All three of these tools allow you to estimate how many people are requesting a particular search query. You only need to check the most basic keywords to ensure that your niche has search traffic. For example:
You can also learn how to use Keysearch.co and analyze your topic in a free course from renowned blogger Sharon Gourlay.
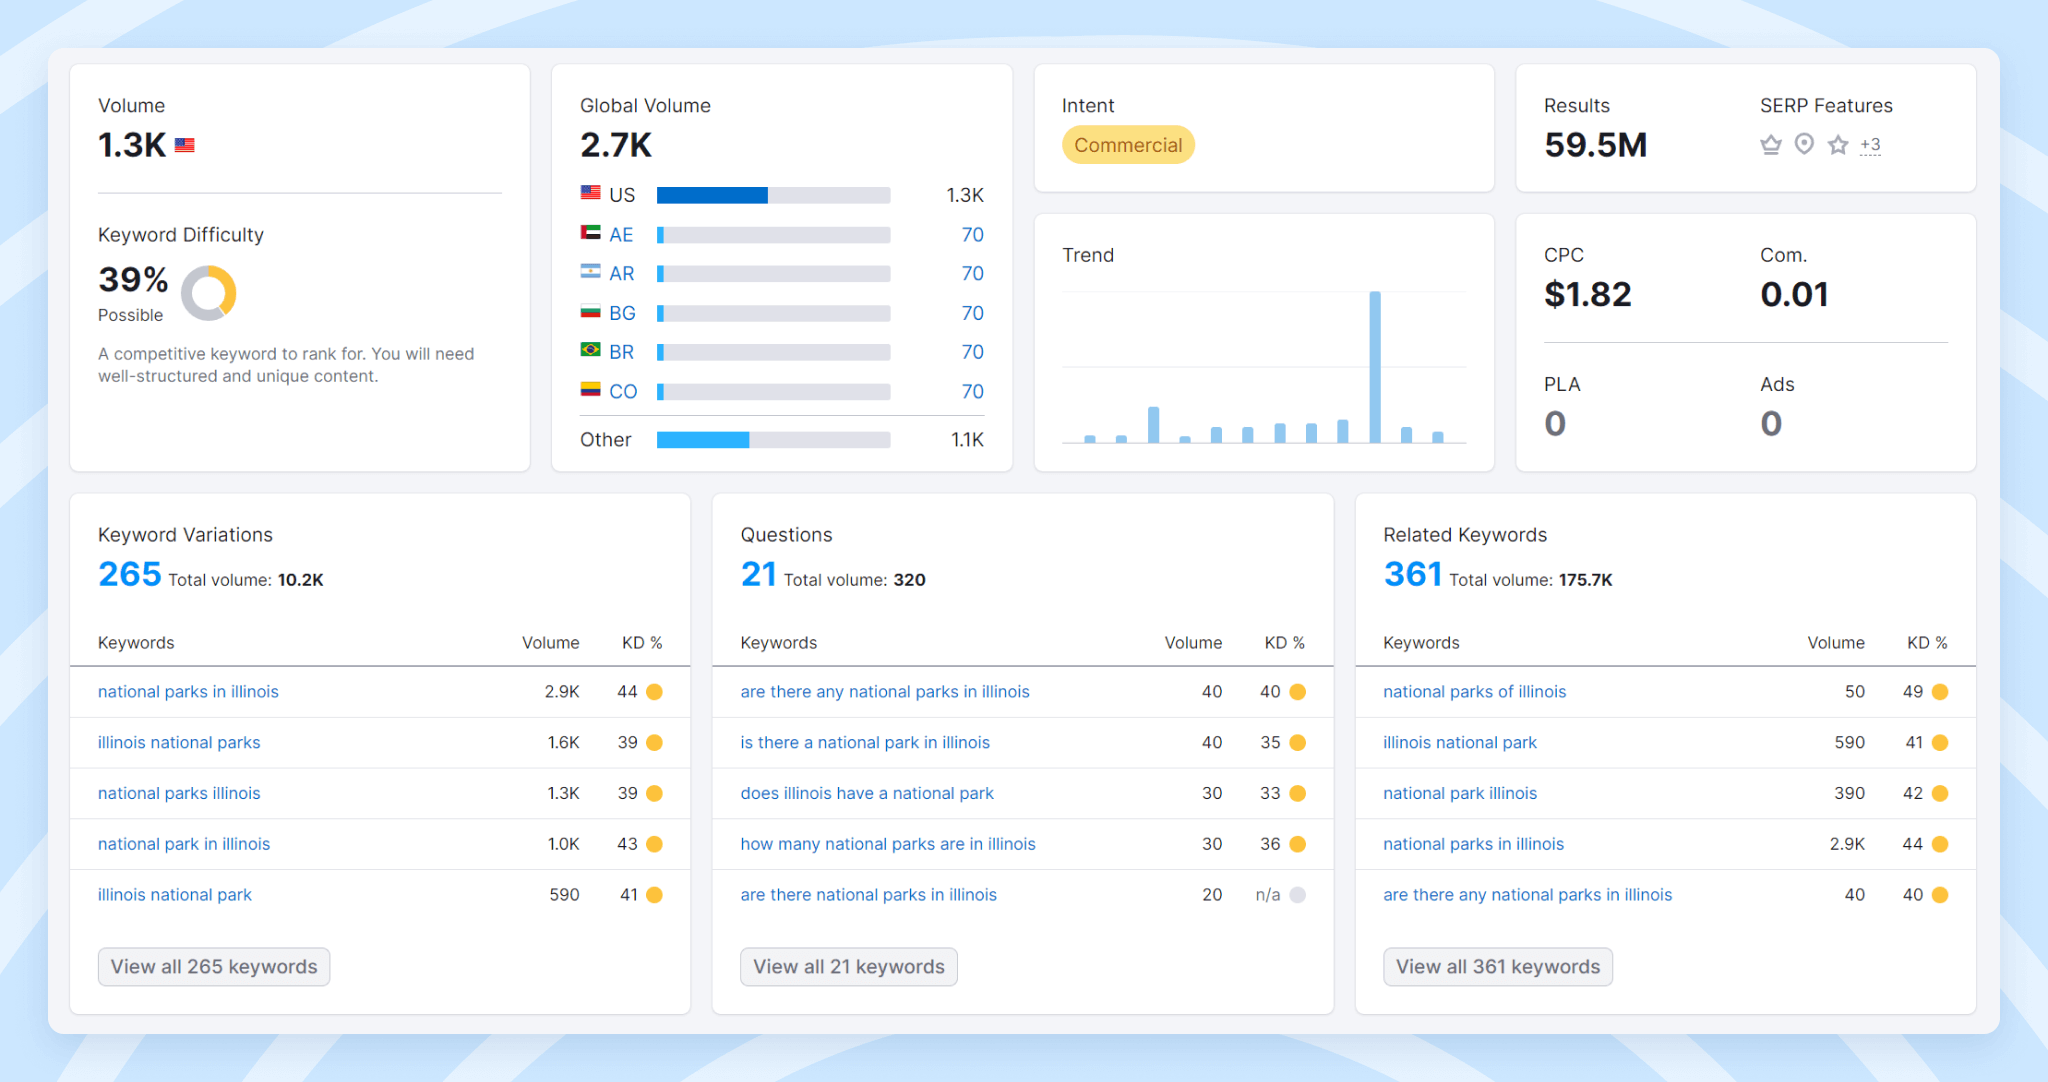
It is also important to choose topics that do not have high competition. Talking about the LAX airport is interesting to many, but this topic is already highly competitive (as can be seen through, for example, KeySearch.co).
The ideal topic for your travel blog should meet the following criteria as much as possible:
- Be personally interesting to you
- You understand the topic at a sufficient level to share your experience and knowledge with others
- Other people are interested in the topic
- There is low competition in this niche (at least in some search queries)
Further in our free guide on how to start a travel blog, we will return once again to the issue of choosing topics for specific articles (in the section about content), but it is important to lay this out at the stage of choosing the niche of your future travel blog.
Step 2 – Buy a Domain
Your domain is the address of your future travel blog. For example, your domain might be angelatraveljourney.com or travelwithdavis.com.
The bad news is that most of the short and beautiful names are already taken. But the good news is that there are millions of domain names available. All you have to do is come up with a unique name that is not taken by anyone. Alternatively, you can consider domains outside of the most popular zone (.com) and in a less popular zone (.net, .org, .blog, .travel, etc.), where there are many more available names.
To buy a domain, you need to go to the website of any reliable registrar, for example:
You can choose any registrar you like. There is not a big difference except the prices, as all the registrars are just re-selling domain names. Of course, check the references before purchasing.
To buy the domain, you will need to create an account, fill in your personal data for the purchase, and select a domain. Most registrars also offer name selection assistance by automatically generating unoccupied domains, such as:
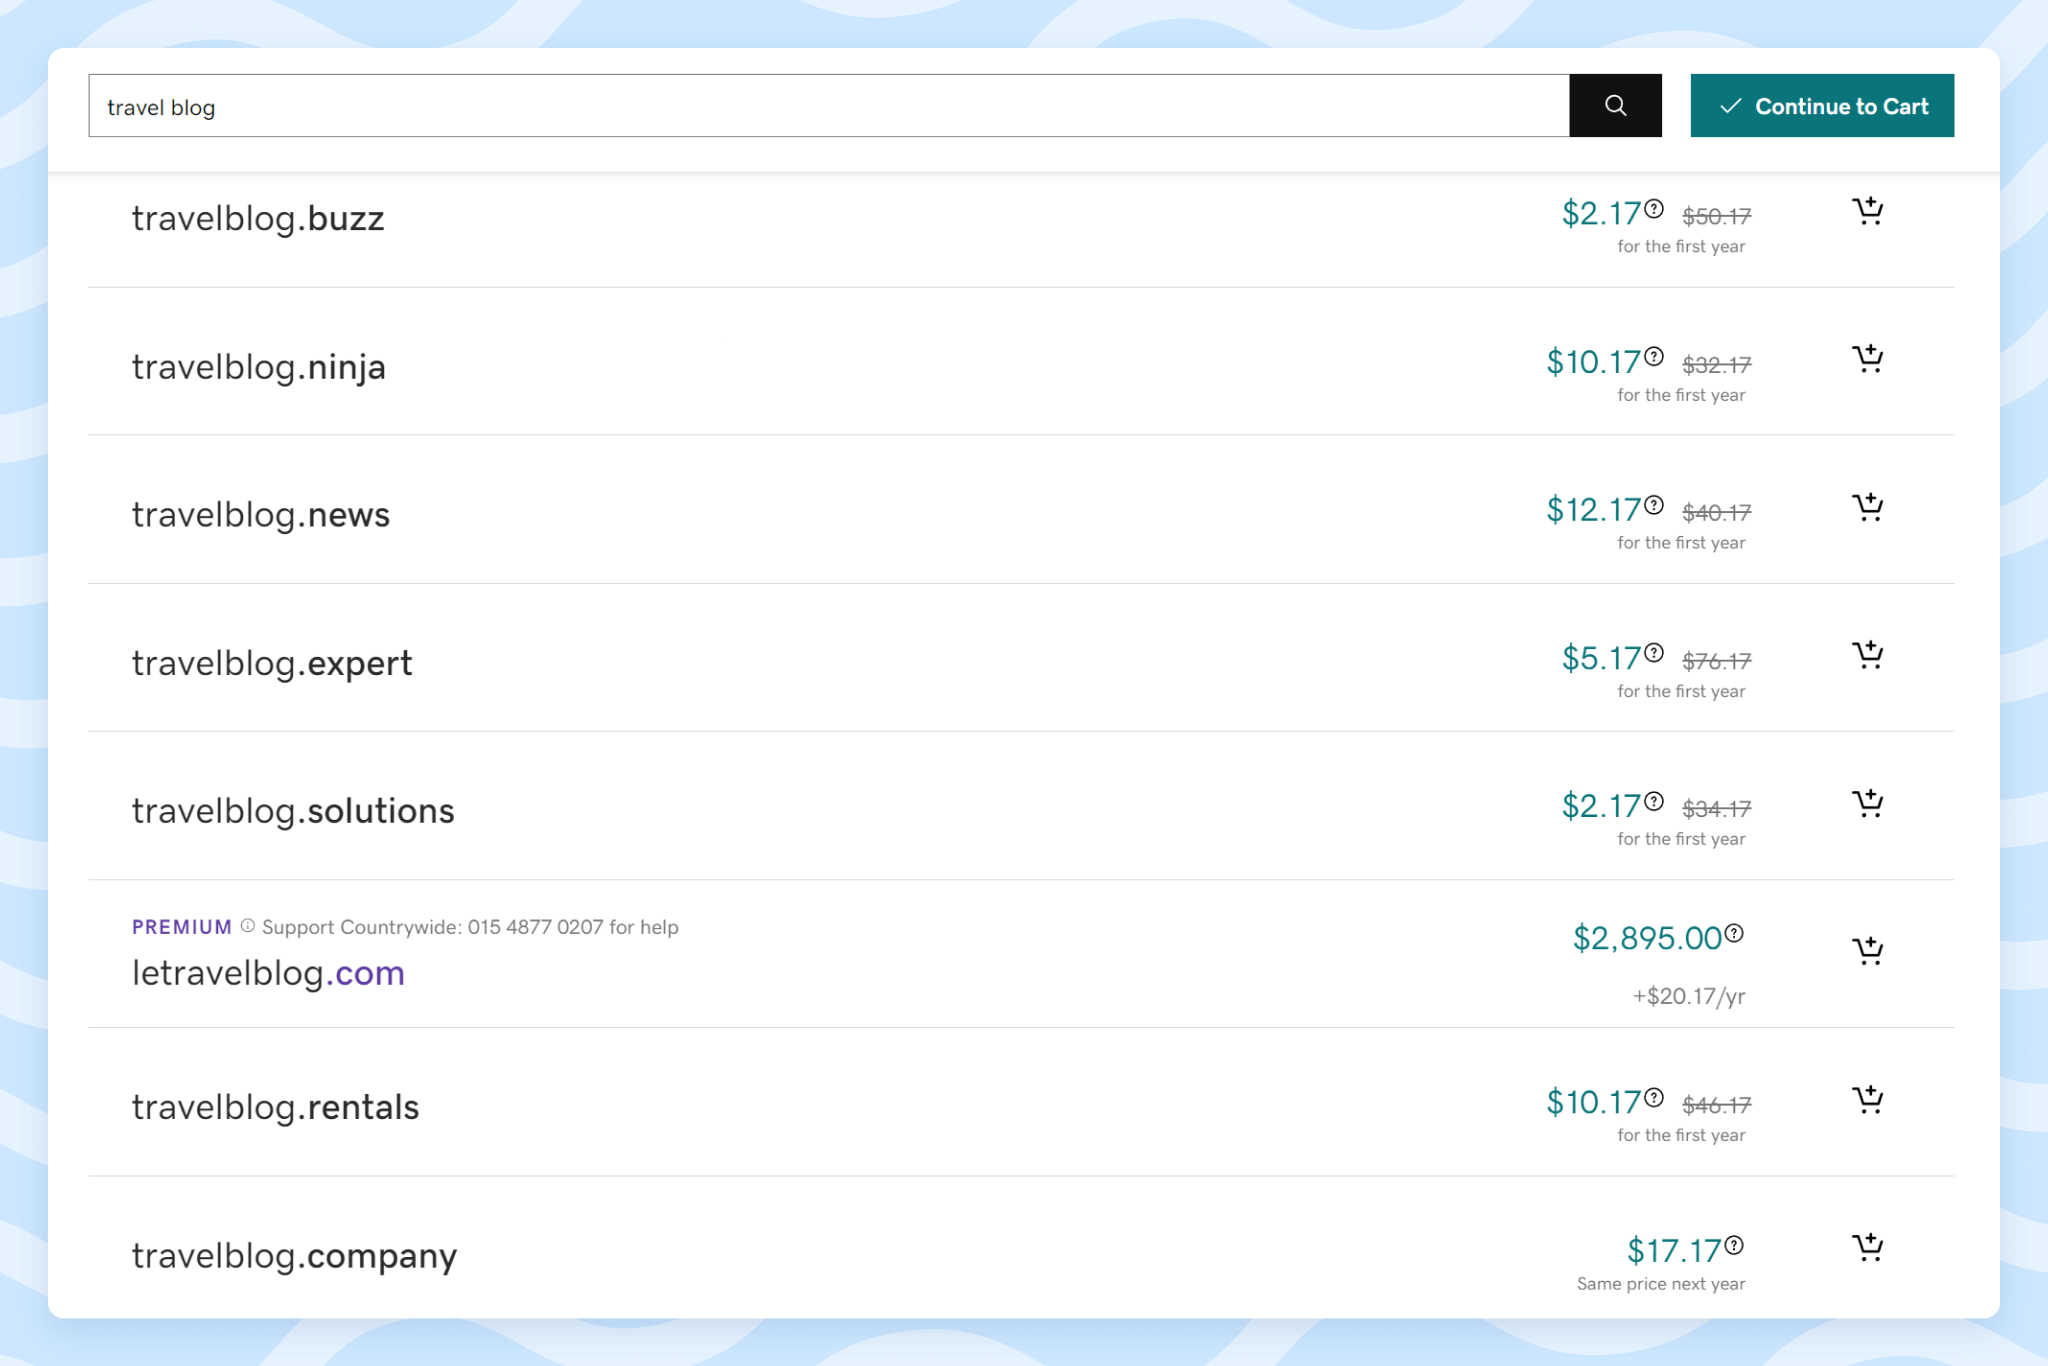
Try to find a domain that is no longer than 15 characters. While this does not critically affect blog promotion, in the future, it may be more problematic to indicate a long domain on social networks and other platforms. A long domain name can also be harder to remember for your returning visitors.
If you can’t find a suitable domain among the unregistered options, you can look at the available domains for sale. For example, on Sedo.com you can find hundreds of travel domains:
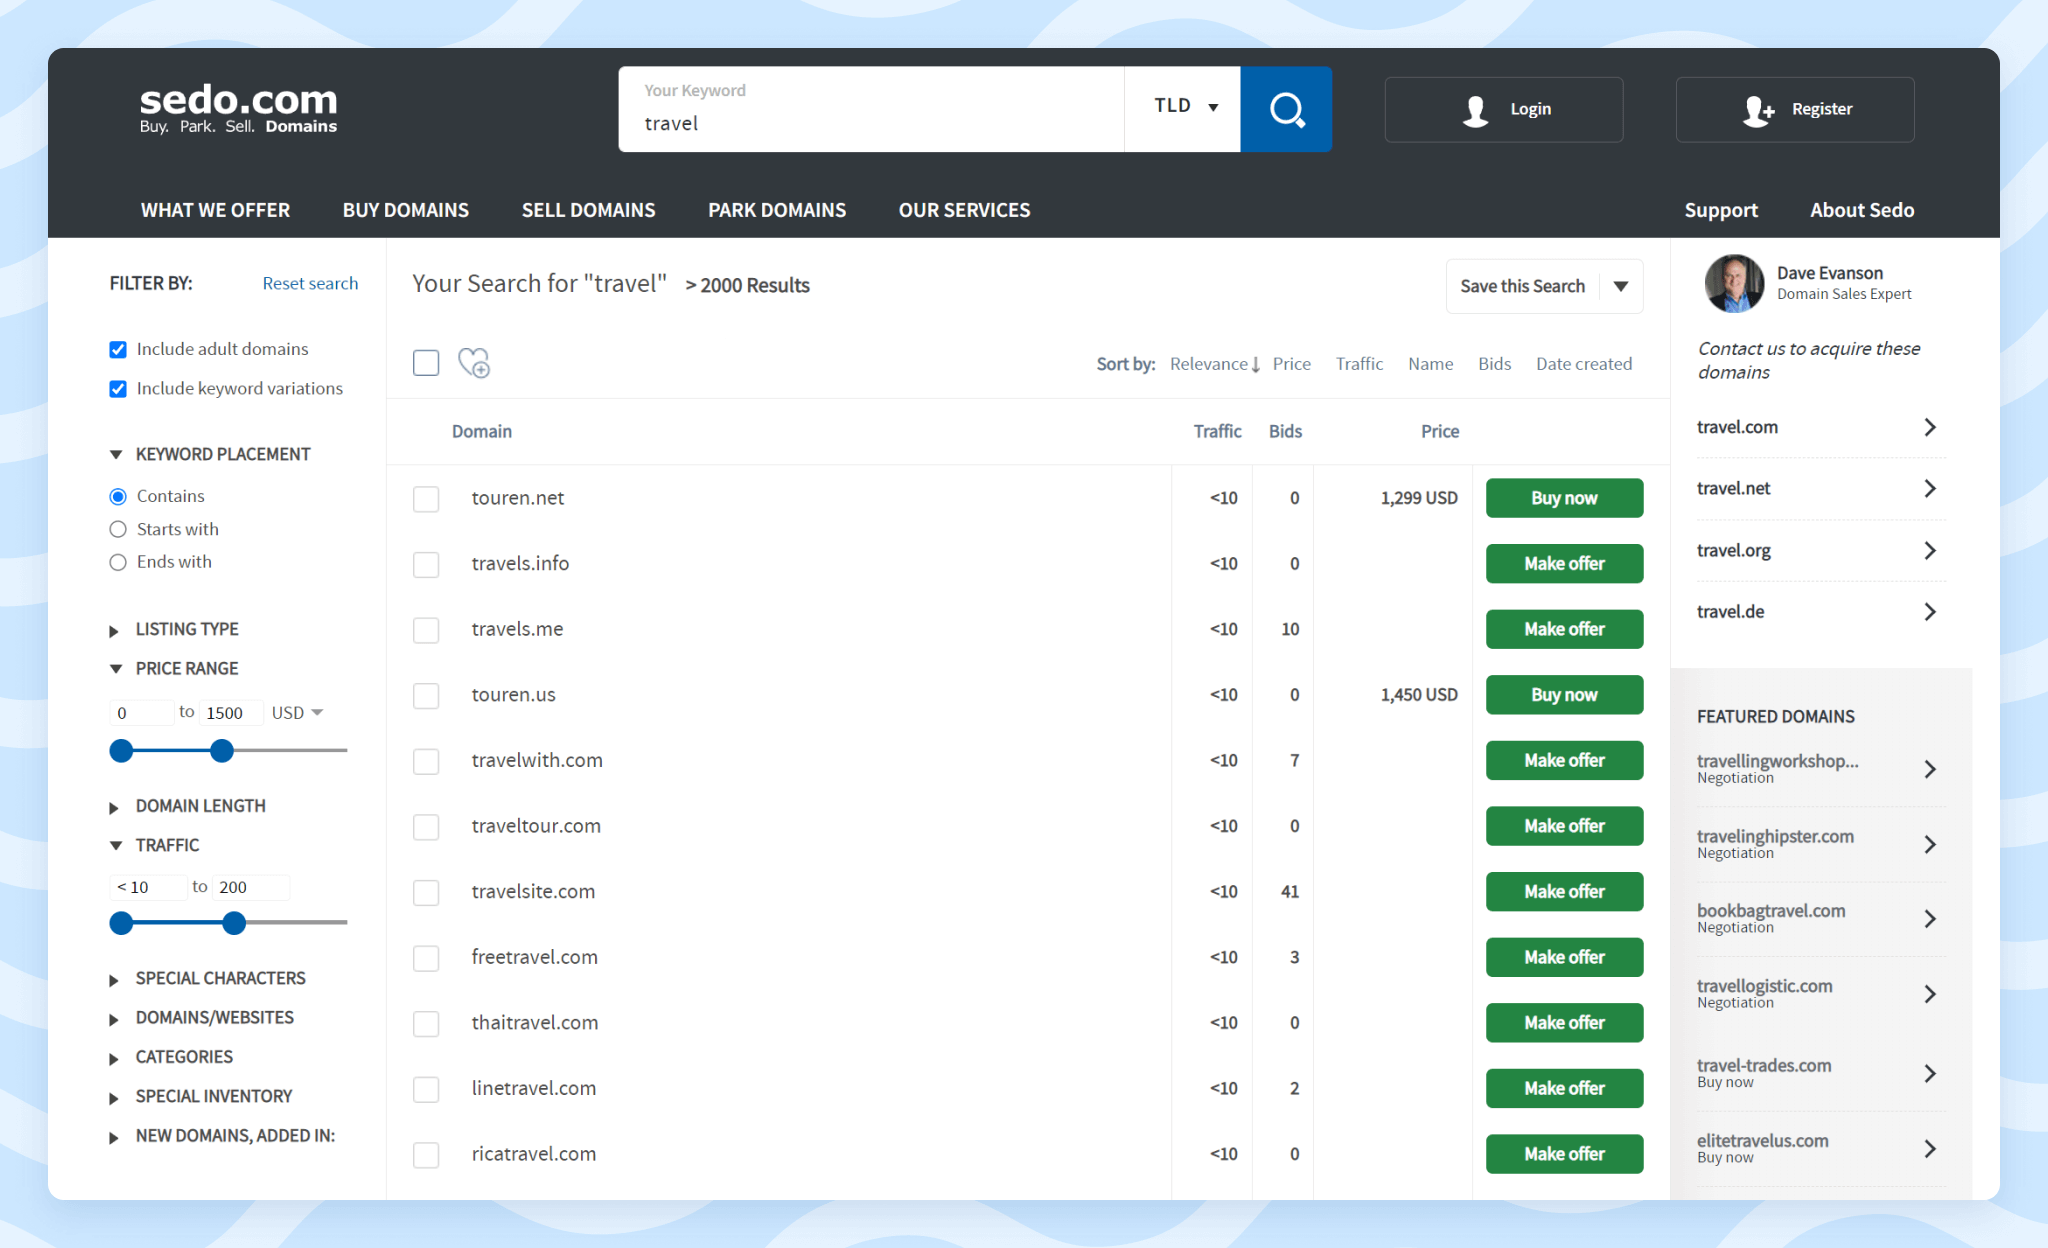
The price of such domains is often several thousand dollars. You don’t need to spend much, as you can definitely find a free name, which in the end will cost you just $10-20 (for a domain in .com zone).
Please note that you do not buy a domain forever. You will have to pay annually for its renewal. Therefore, when choosing a domain zone, pay attention not only to the purchase price, but also to the renewal cost. In some zones, the purchase price may differ tenfold from the renewal cost.
For the .com domains and most others, you can pay for several years at once; however, if you are just starting a blog, this likely isn’t worth it, as you can always renew it later. This is your exclusive right and other people will not be able to renew your domain.
In addition, your domain may contain one or more keywords that characterize the subject of your blog. For example, if you’re planning to write about traveling with dogs, why not include the words “pet”, “dog”, or similar right in the domain name? This is not obligatory, as you can imagine a branded domain name without any keywords that works the same as a domain name with keywords.
Some platforms offer free third-level domains, such as travelblog.wordpress.com. Such domains are attractive because they are free, but you will not have full access to them. Therefore, it is better to buy your own domain (.com, .net, .travel, .blog, or any other) during the initial stage, as this option is safer and will give you more flexibility to manage your website.
To make it easier for you to choose the right domain, you can be guided by the following rules:
- Check the availability of domains. Many names are already taken, but you will definitely be able to find a domain to buy.
- It is ideal to include one or more keywords in the domain name that will reflect your niche.
- Choose domains no longer than 15 characters.
- Buy a domain. Don’t use free alternatives (such as third-level domains).
- For fast selection, you can use free domain name generators.
Pro Tip: Once you pick a domain for your blog, you can immediately grab similar names on the major social networks: Instagram, Facebook, Twitter, and more. This will increase the chances that your blog and social networks will have the same name.
Step 3 – Set Up Hosting
For your travel blog to be accessible to your audience, it must be located somewhere. Just as your photos are located on your computer, your website will be located on the hosting company’s computer (server).
You do not need to understand technology or be a programmer. Everything is just as simple as buying an Amazon subscription. You can also buy hosting online for a month or another period.
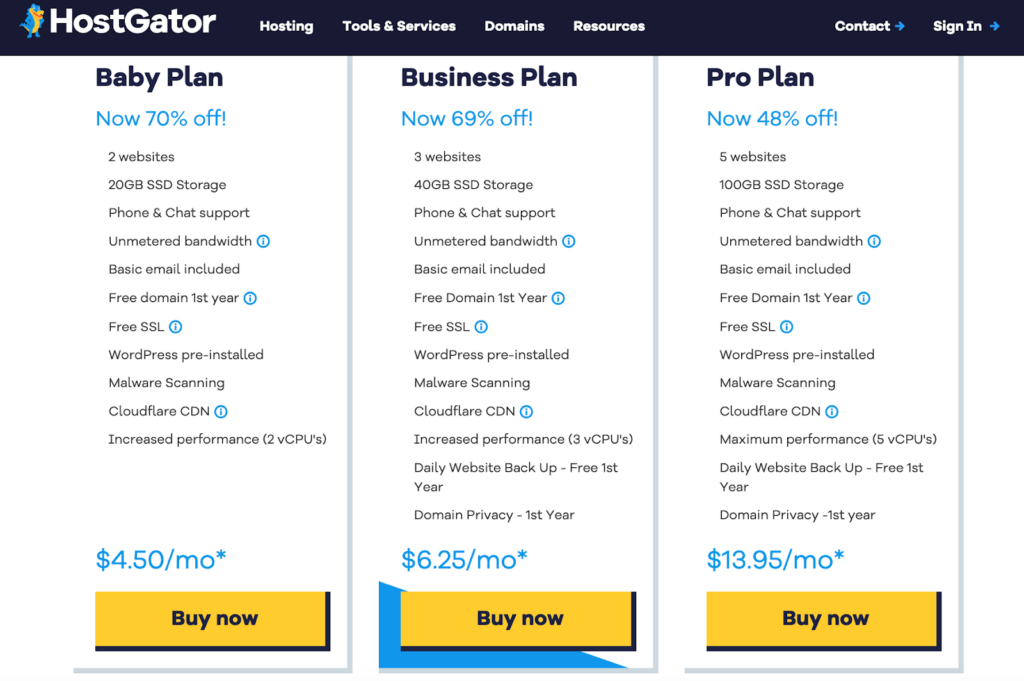
Hosting companies offer affordable ($5-10 per month) plans that will be enough for any aspiring blogger. For example, you can order hosting from the following companies:
If you don’t have any specific requirements, for example, if you want to install WordPress CMS (we will share more details about this system below) and simply publish articles, then most of the time you will be fine with simple plans, such as HostGator’s Starter plan:
Just like a domain, you don’t buy hosting forever, you pay for it as a subscription. Your domain will be yours for at least for a year. You can purchase a hosting plan for the same period. Discounts are often helpful.
Some hosting companies give a domain as a gift if you pay for their services for six or more months at a time. This is a good option for getting a free domain for a travel blog. However, pay attention to the cost of domain renewal. Sometimes, hosting companies have higher renewal prices than domain registrars and it may be worth rejecting the free domain option or simply transferring it later (after one year) to a direct domain registrar.
After you decide on a hosting option and buy their services, you will find the names of NS servers, for example:
- NS1.server.com
- NS2.server.com
- NS3.server.com
- NS4.server.com
Don’t worry, you don’t need to understand in detail how this works. All you need to know is that your hosting “address” is like your residential address. In order for your domain to be loaded from the host, you need to specify these NS servers for the domain. To do this, you will need to return to the control panel where you registered the domain and specify the DNS. Most domain registrars offer clear instructions, such as Dynadot, and provide help for free if needed.
After you specify the NS records for your domain that will lead to the hosting you ordered, your site will be “loaded” from this computer. Then, you will have to create your travel blog.
Step 4 – Install WordPress (or Another CMS)
The good news is that you don’t need to know how to code to create a travel blog on your own. It’s much easier. You can use a free off-the-shelf content management system called WordPress. Most blogs run on it. In fact, even the Travelpayouts blog runs on WordPress.
WordPress is a visual system, on which you can create articles, set the design of your blog, and generally manage the site as you would manage your phone or email. To make this possible, you must follow these instructions:
- Download the latest version of WordPress from the official website.
- Connect to your hosting via FTP or via a browser (your hosting company will definitely have instructions on how to do this).
- Upload the archive with WordPress to the server.
- Unzip the archive.
- Create a new database in the hosting control panel (or ask support for help).
- Go to your site in the browser (just type in the domain name – it will already be available in the WordPress installation mode and the system will ask you to provide data .to access the Database).
- Specify database access data.
- Set the username (for example, admin), email address, and password.
- Installation completed.
After you complete these nine steps, your travel blog will already be available to readers and search engines. It sounds more complicated than it really is. For pros, it takes a minute, but for you, it will only take 5-10 minutes. Here is a clear video tutorial on how to install WordPress yourself:
To get into the site management area, add /wp-admin/ to your site address (for example, travelblog.com/wp-admin/). This will take you to the administration area.
In the admin panel, you can add new articles, change old ones, moderate comments, manage the appearance of your site, and generally manage your site.
Step 5 – Customizing the Design
As with programming, you don’t need to have design skills to create a nice travel blog. There are thousands of paid and free templates that you can install on your site that will look much prettier than the basic WordPress template that is available to you right after you install the CMS.
You can choose a design directly from the admin panel. To do this, go to the design settings and enter a search term (for example, travel):
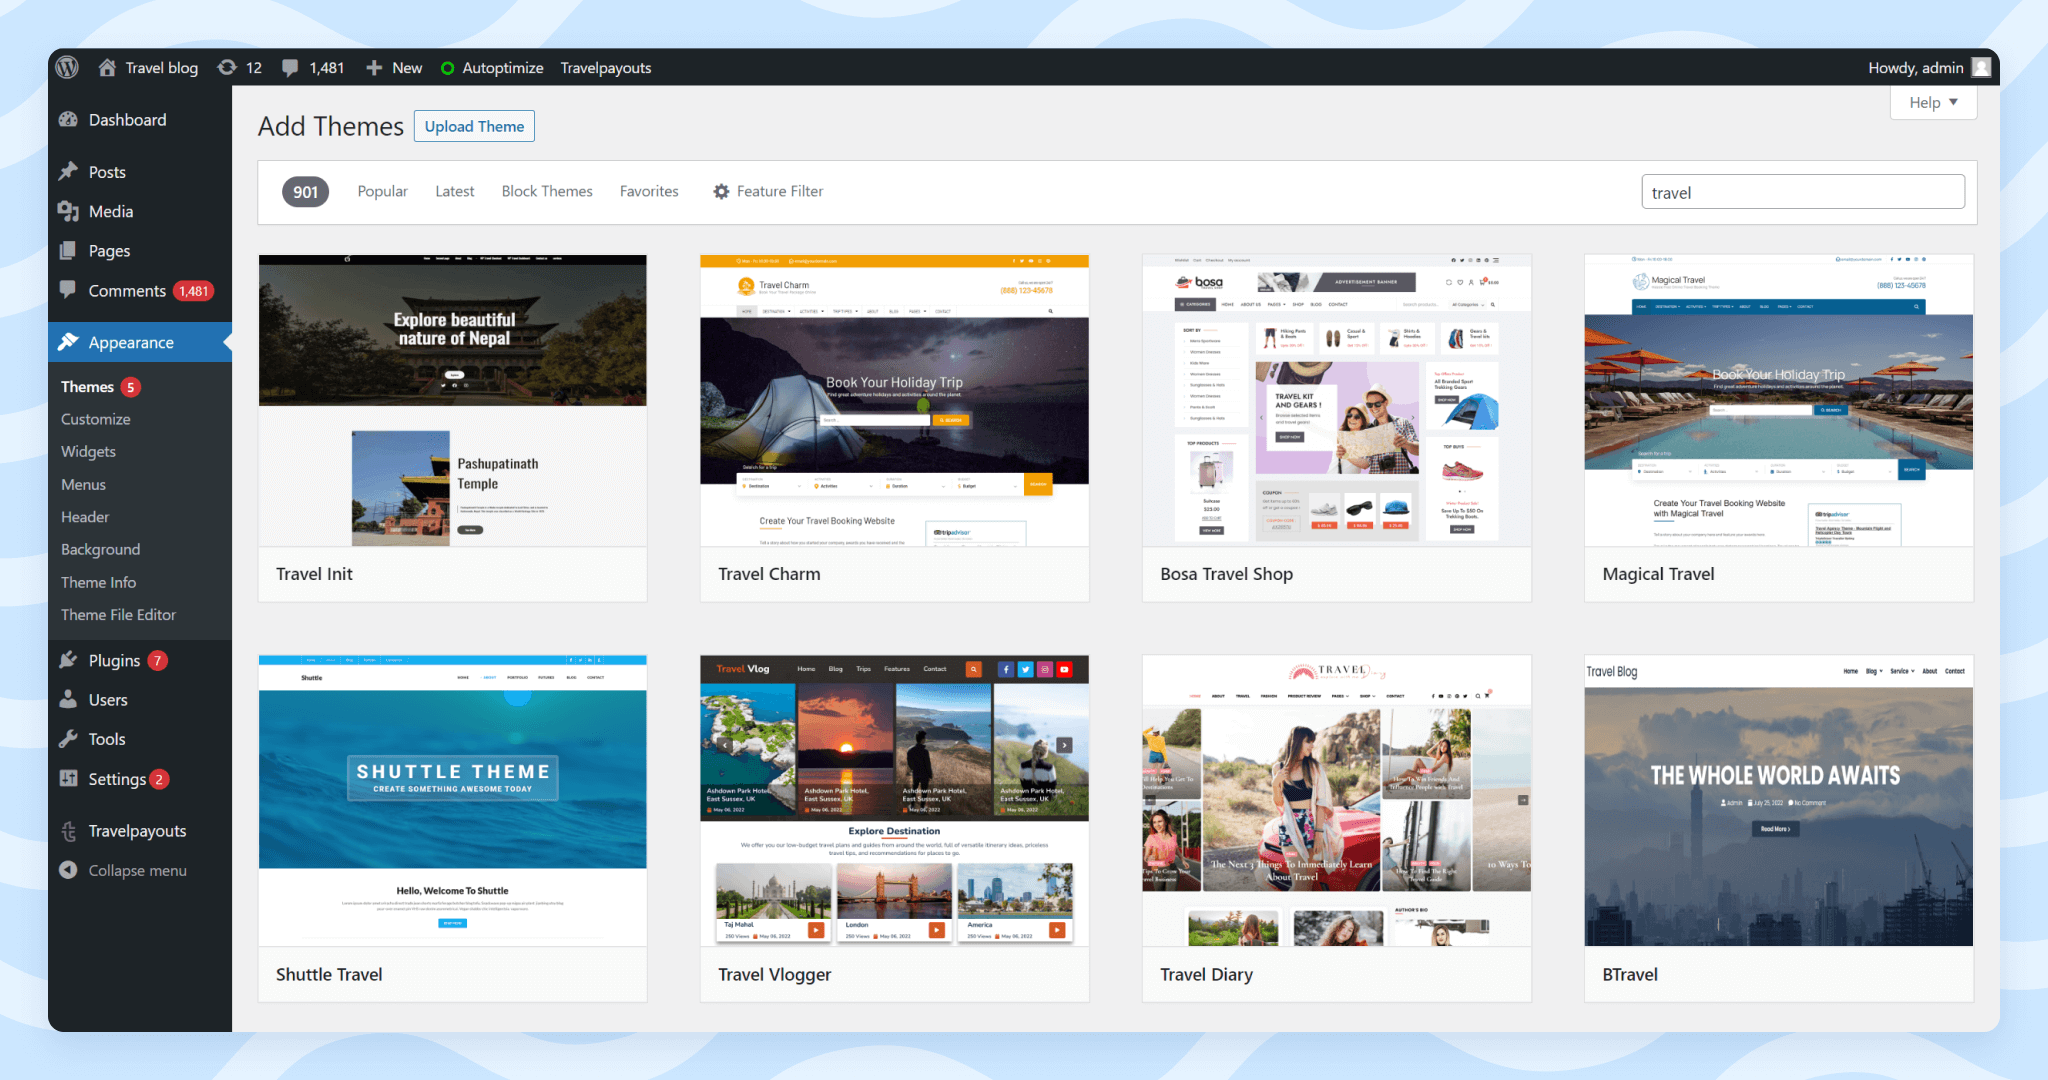
For example, you can choose the template Tafri Travel Blog or WEN Travel Blog. You can find even more free templates on the official WordPress website.
In addition to free templates, there are also paid options (for example, on the Themeforest website). The cost of one template is about $50-80, which is undoubtedly cheaper than ordering a website design from scratch.
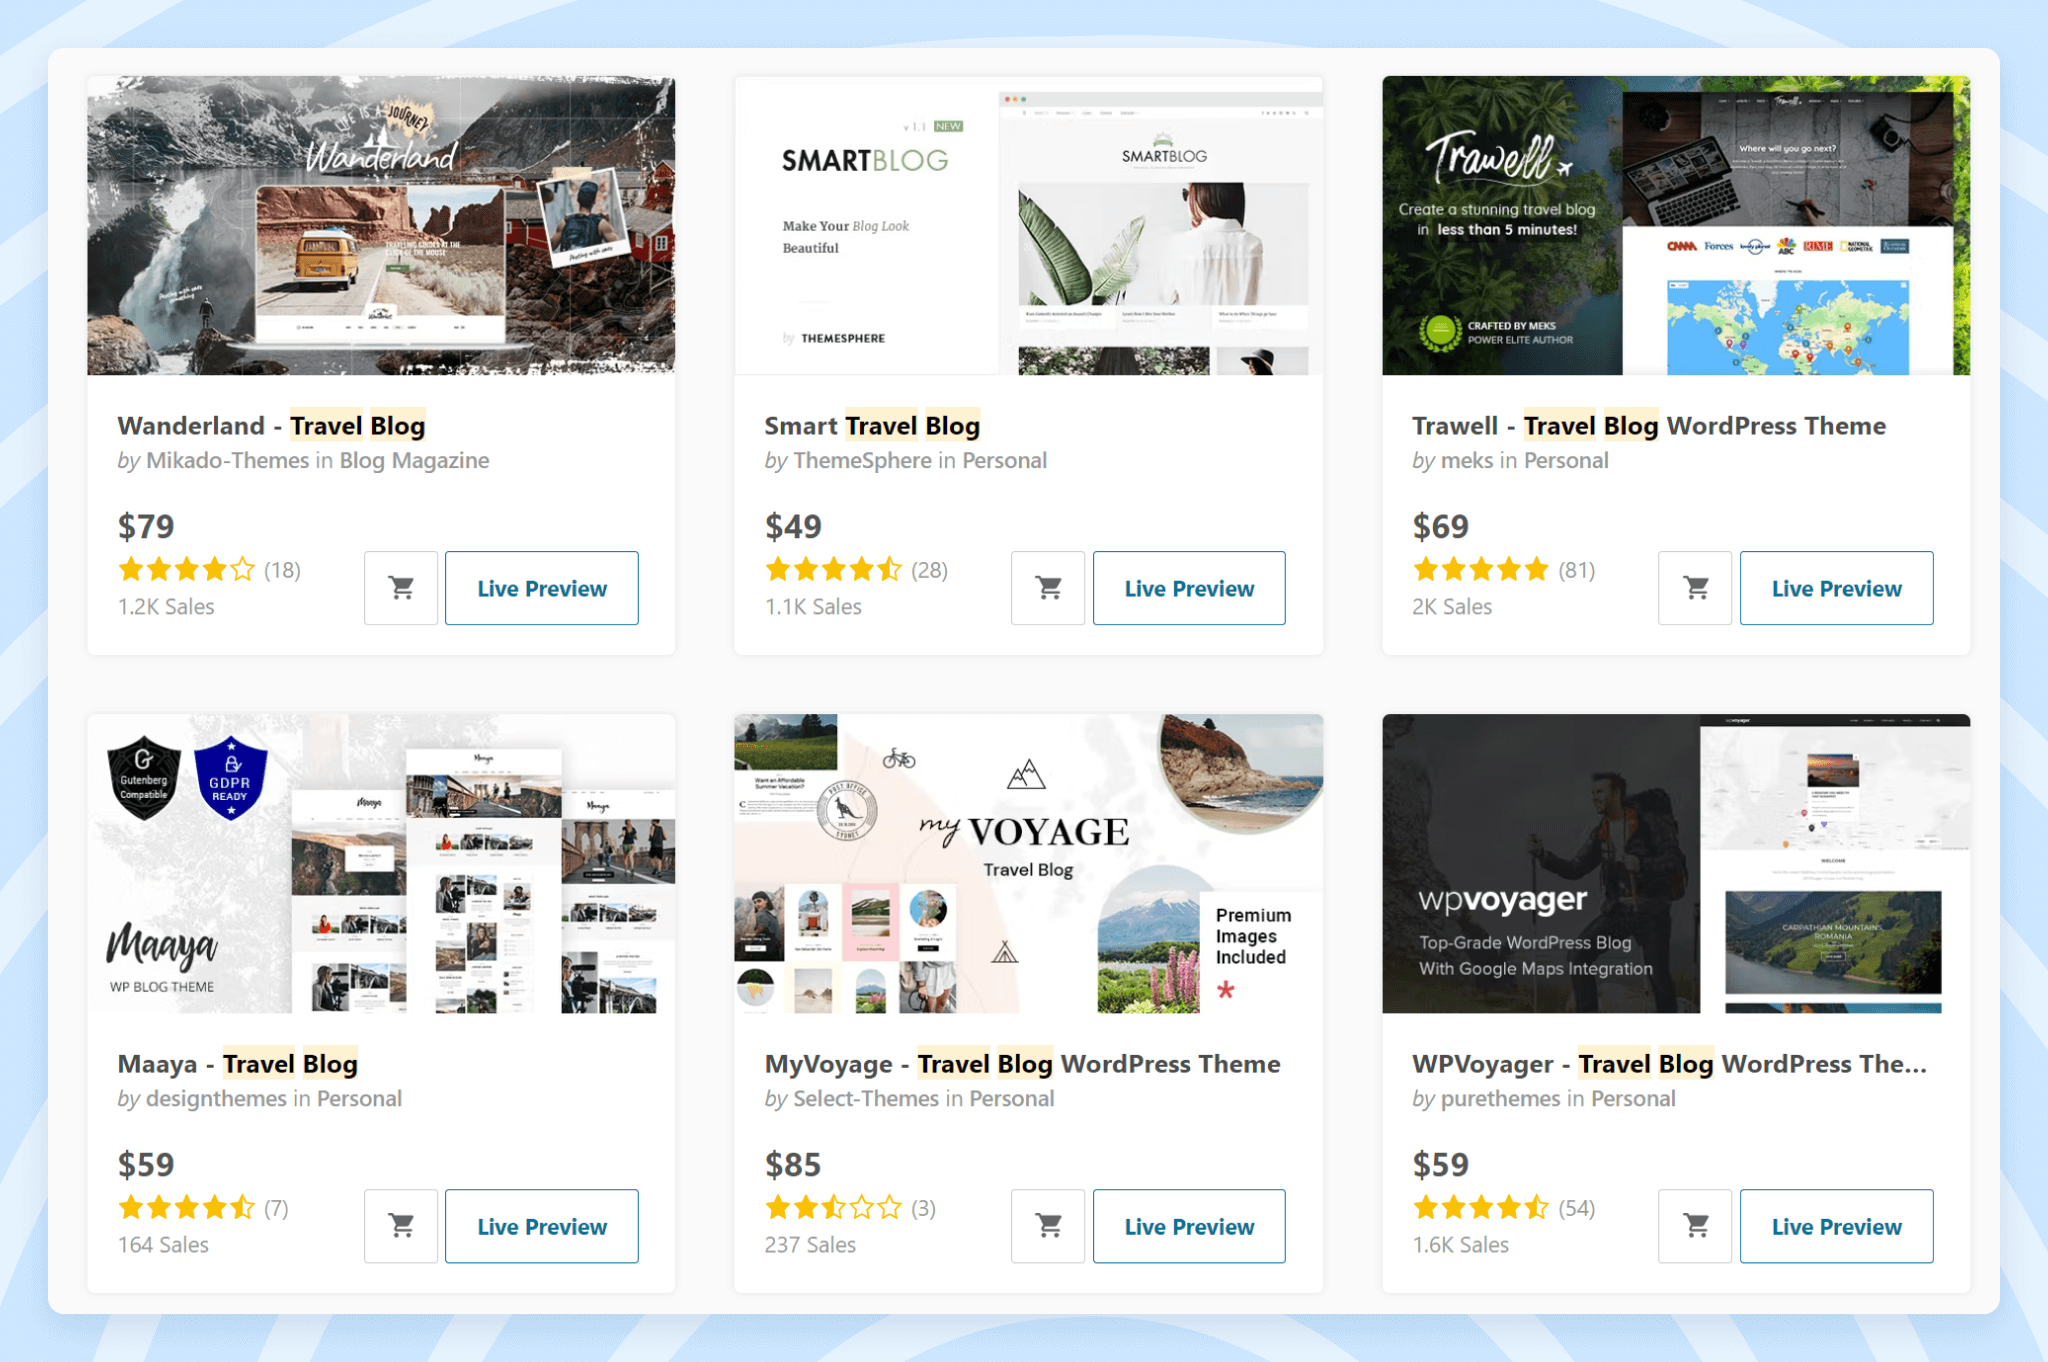
In paid and free templates, you can make your own changes. For example, change the color scheme, add a logo, etc. Therefore, even if you use a ready-made template, your site can look completely different from other blogs and you can express your individuality.
Unlike a domain name, you can always change the design of your site. Therefore, during the initial stage, you should not spend a lot of time choosing your design. To speed up the process, you can refer back to the following rules:
- You should love the design of your blog.
- Your theme and article template should be easy to read for your audience.
- Your template should not slow down your site (below, in the traffic section, we will discuss this in more detail).
If you still find it difficult to choose a design, you can go through the sites of other travel bloggers and see how they design their sites. However, as you can always change the design completely or improve it, don’t be afraid to make mistakes. Choose what you like and don’t necessarily go for a paid option, there are plenty of unpaid options as well.
Step 6 – Create a Blog Structure
Creating a blog structure can be done along with the first step, when you plan to create content, but it should not be delayed beyond the sixth step.
After you bought the domain, set up hosting, WordPress and initial design, your travel blog is now ready to be filled with content. However, before you start creating content, think about your future site structure. This can be done in the menu area and might, for example, break down which topics you will be writing about:
- Flights
- Accommodation
- Excursions
- General Tips
Consider how your content will be divided into categories and how to make it convenient for your audience to interact with. Reflect your blog structure in your website menu so that your audience can easily interact with your blog.
In WordPress, categories and buttons in the menu are created in a simple, user-friendly interface in the admin panel. For example:
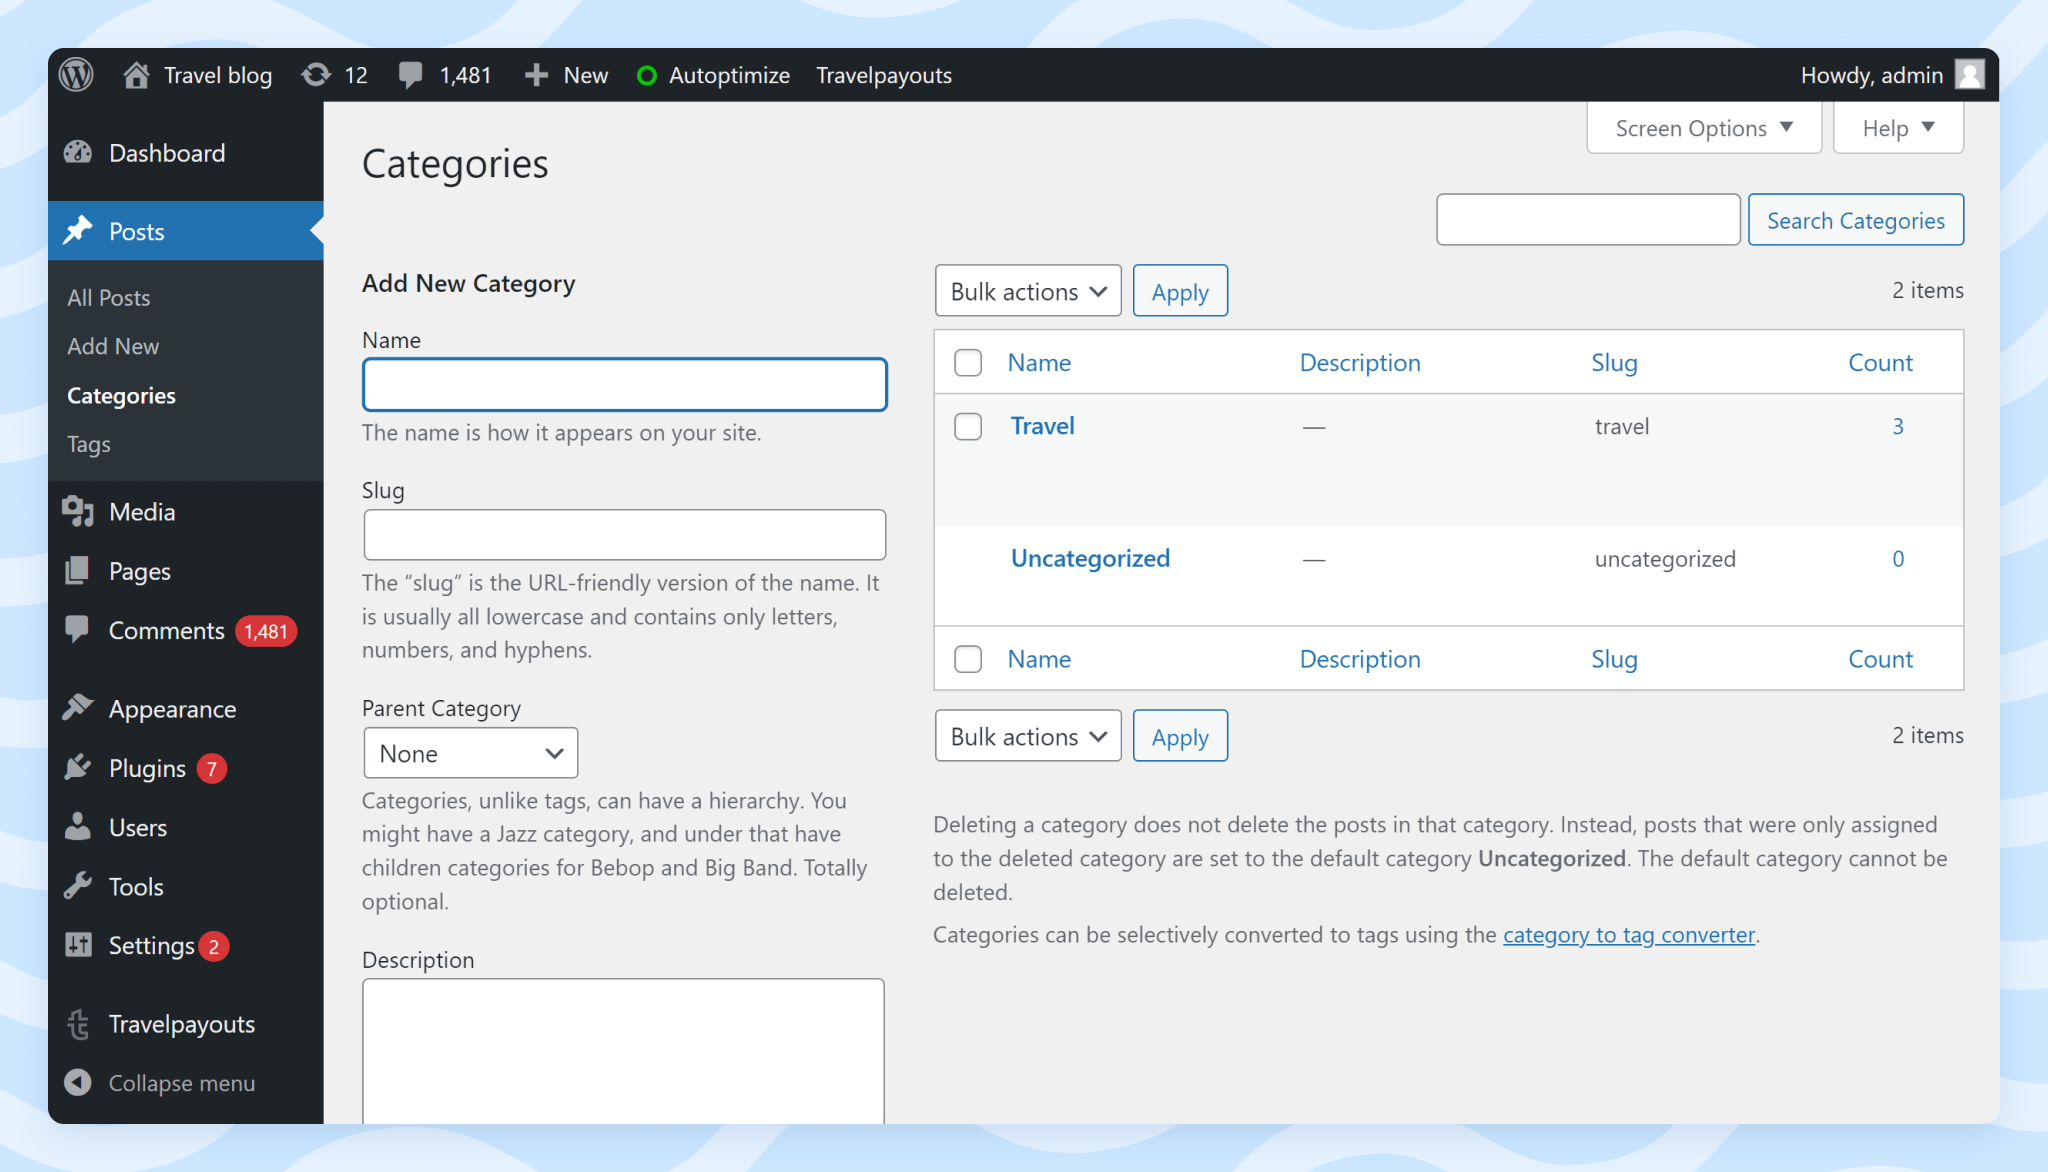
Don’t be afraid to make a mistake, you can always add a new category or combine old ones. However, from the beginning, try to create the widest structure that suits your blog idea.
Step 7 – Create Content
All previous steps were mainly preparatory. The real blogging begins from this point and never ends. You can always create new content almost endlessly.
What to Write About
Returning to the very beginning of your blogging journey, when you were planning what your future blog would be about, you need to be guided by basic principles and write about:
- What you are interested in
- What you are good at
- What your potential audience is asking about on Google
- Topics with lower competition
Competition is one of the main difficulties faced by beginner bloggers. You will launch a website and compete with blogs that have existed not for one or two years, but for decades. This does not mean that you will fail, but when choosing topics, you should always focus on those with lower competition. For example, it is good if the topic of your future article is not yet in the search results:
- Top-rated domains (DA over 70)
- Old sites (10+ years old)
- Main pages of websites
In fact, you can write on competitive topics as well, but during the initial stage, it will be difficult to get traffic on them. As your main goal is to generate traffic (and income), choose the topics according to the competition and then gradually grow your travel blog and create future articles for increasingly competitive topics.
For your convenience, you can create a calendar of when your posts will be released. This can also help you determine the order of writing. This schedule will help you avoid confusion as well as make you more disciplined, as blogging can be difficult and unstable, especially in the beginning.
How to Write Content
Anyone can create content. It doesn’t require a university degree in journalism or a master’s degree in article processing. But it is beneficial to follow the basic principles of content creation:
- Before you start writing the whole article, write down the structure of your future text. This will allow you to easily build a concise and structured text. In this case, the chance that you will forget the important point is lower, and it will be easier for the reader to understand your text.
- Writing an article on the first try is almost impossible. Therefore, feel free to make a draft version of the article, which you will return to a bit later, add to, and ultimately use to create the final version. However, don’t extend this process so long.
- Work only with reputable sources. Your personal opinion and experience are very valuable, but if you were, for example, in Barcelona last summer, then before giving advice to readers, check if your information is up to date. If the information changes quickly and you are not prepared to update your materials regularly, leave a link for your audience, where they can independently check the accuracy of the information.
- If you have the opportunity to show the final material to someone before publication, take it. It’s ideal to show your article to an editor or someone who understands copy-editing, but if you are not acquainted with such a person, it’s enough to show your article to a friend, husband, wife, or whoever. An extra pair of eyes will help improve your writing.
You should not attempt to make your text perfect, as this will constantly postpone its publication. The best publication is the one that came out, and if you always want to improve the article before publication, this can greatly prolong the process. Also, a blog is not a printed newspaper. You can always go back and correct the information in your blog or even hide outdated material.
If you want to create content like a pro, then in addition to practice, you can also take courses. There are many online copywriting and blogging courses available now, such as:
For those who want to start a travel blog, it is important to remember this main piece of advice: just start. When you release your first articles, you will better understand how to prepare content as well as what you are missing. Therefore, the best advice is to start publishing posts. You will understand the rest as you go through the process.
Photos and Videos
In addition to text, do not forget about photos and other visual materials. When other travel bloggers make posts, most of them share several quality photos and videos. Travel is a niche in which the audience wants to see what you are talking about.
Therefore, before even preparing your article, determine where you will get related photos. For example, you can use your own travel photos. However, if you don’t have any or the ones you have are not enough, you can use stock photos from the following sites:
- Pixabay (free)
- Unsplash (free)
- Shutterstock (paid)
- Envato (paid)
Photos in posts are an integral part, which should not be neglected, including for promoting your posts in search engines (which we will discuss below), since search engines evaluate pages, including by the presence of visual content.
You can also add videos from YouTube to your articles (including from other people’s channels). In the same way, as we embed YouTube videos in this article, you can do the same. Video can improve your article and help the reader achieve a better understanding of the topic.
Pro Tip: You can start your own YouTube channel. Even if you don’t travel much and are not willing to capture every moment, you can design motion videos and make voice overs to share information. After you reach 1,000 subscribers and 4,000 watch hours, you will be able to monetize your videos.
When preparing posts for your travel blog, don’t forget to use the wonderful article design features in WordPress. You can also add bullet points, tables, image captions, and other elements to make it easier for your audience to interact with your content.
Step 8 – Drive Traffic to Your Site
Creating content and driving traffic to your site are inseparable—one follows the other. You will definitely need to work not only on creating content, but also promoting your travel blog so that your audience size keeps increasing every month.
Organic traffic is the main source for most travel bloggers, but not the only one. Here is a general list of where you can drive traffic to your blog:
- Search engines
- Social networks
- Mailing list
- Advertising
- Direct entries
These are the main sources, but of course, there are others, such as instant messengers. With that said, some of the main sources will probably be in your strategy.
If you follow some travel blogs, you can easily find out where their visitors come from using the free service Similarweb. For example, the sources of the site Adventourbegins.com are as follows:
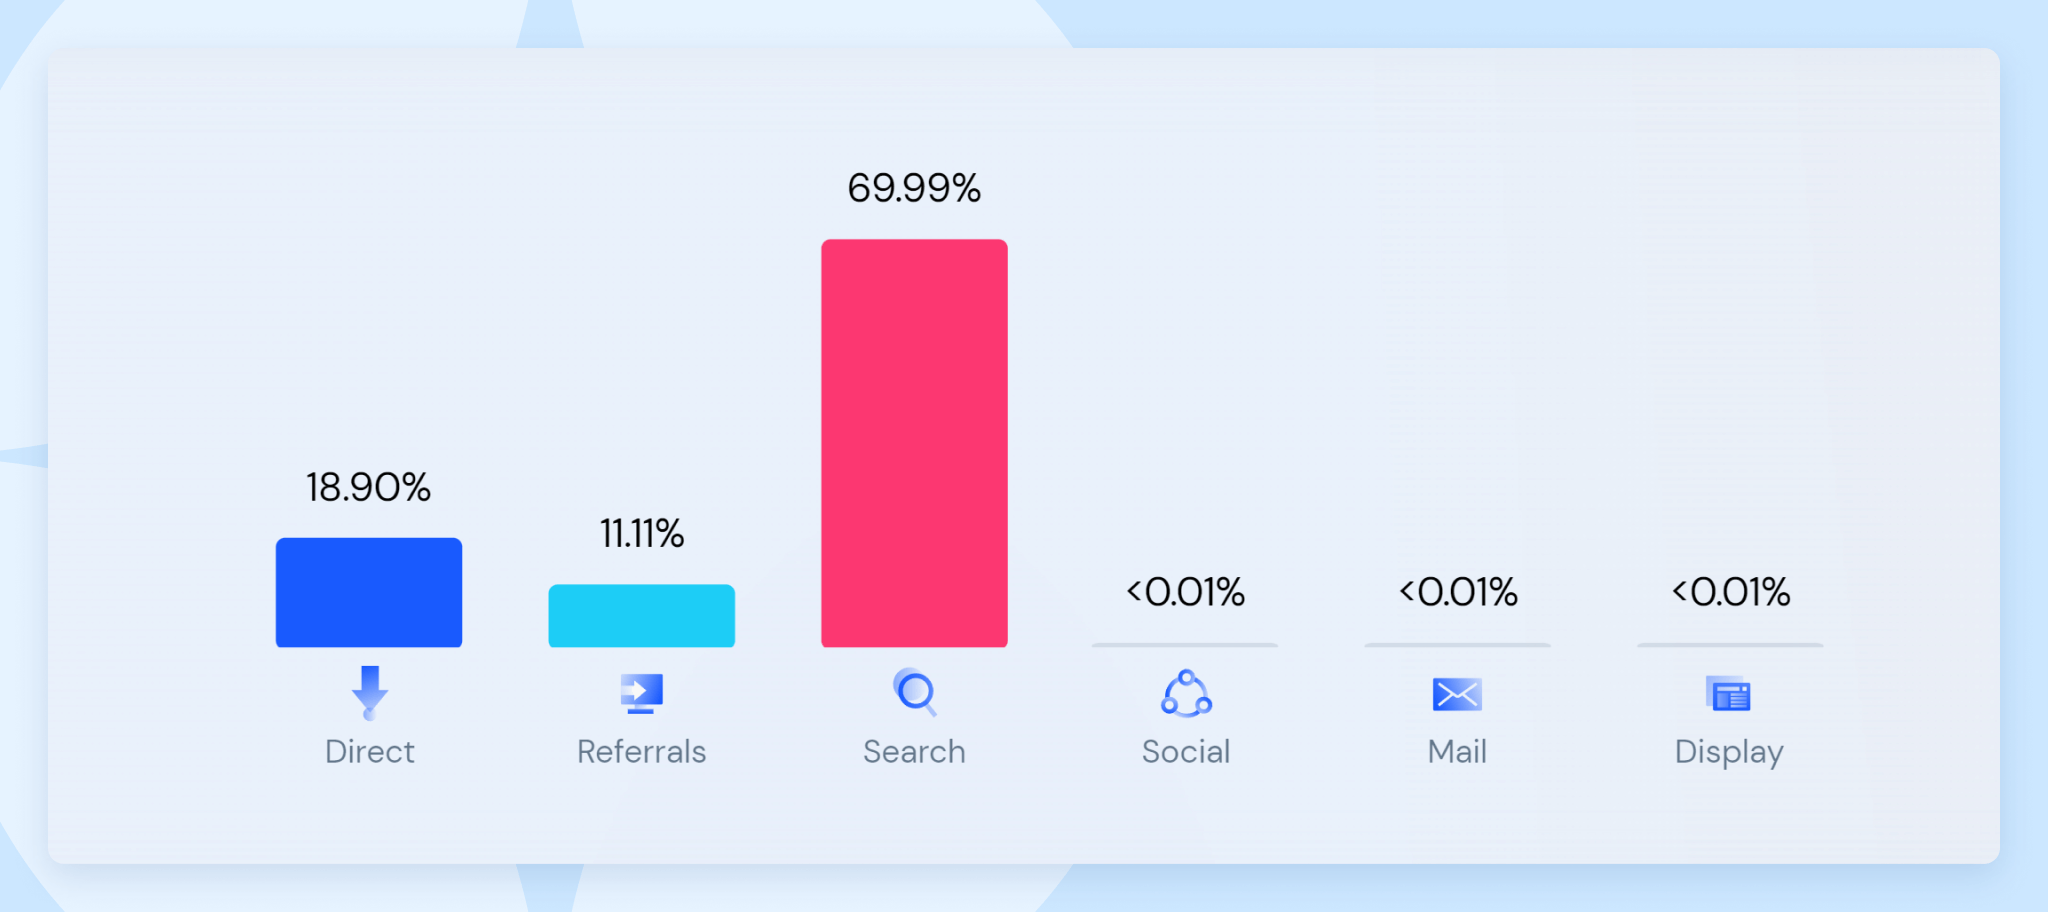
By viewing the sources of your top competitors, you may be able to copy some of their best practices. However, organic traffic is generally a key source of traffic for most travel bloggers.
How to Grow Traffic from Google
To grow traffic from Google, you first need to write content for the search queries that users are looking for, which we discussed above in more detail. However, this will not always be enough and, in addition, you have other work to do.
When preparing content, always look at the quality of your competitors’ content in the search results. How long is the article, what additional questions does it answer, how is it framed, etc. You need to make the article at least as good and ideally better. For example, if your competitors’ articles average 1,500 to 2,000 words, you need to write the same or more.
Pro Tip: In the pursuit of the volume of material, do not forget about your readers. 1,000 extra words won’t do you any good in promoting the material if the information doesn’t help the reader. Therefore, when preparing, first of all, think about whether the material is ultimately useful for the reader and whether your article answers user questions.
In addition to content, you may need to work on your travel blog. For beginner bloggers, there are two things you can focus on:
- Get backlinks
- Speed up the site
Links are how Google understands that a page is of high quality. The more links there are to your site as a whole and to specific pages, the better. However, Google does not welcome the purchasing/selling of links, which could be seen as manipulation of the SERP. You can simply waste your money in vain or have problems with indexing, but there are some ways to get links organically:
- Add links in responses to user questions on Quora and similar sites.
- Exchange links with quality sites (for example, with other travel bloggers).
- Prepare quality content for other people’s blogs and ask for links in return. This method is called “guest posting” and is one of the most popular ways for a travel blog to get backlinks for free.
Website loading speed is the second cornerstone of SEO. Your site should load quickly on mobile devices. To ensure this is the case, compress images (for example, through built-in plugins on WordPress) and avoid using heavy themes to design your site. The download speed can be checked through the official Google tool:
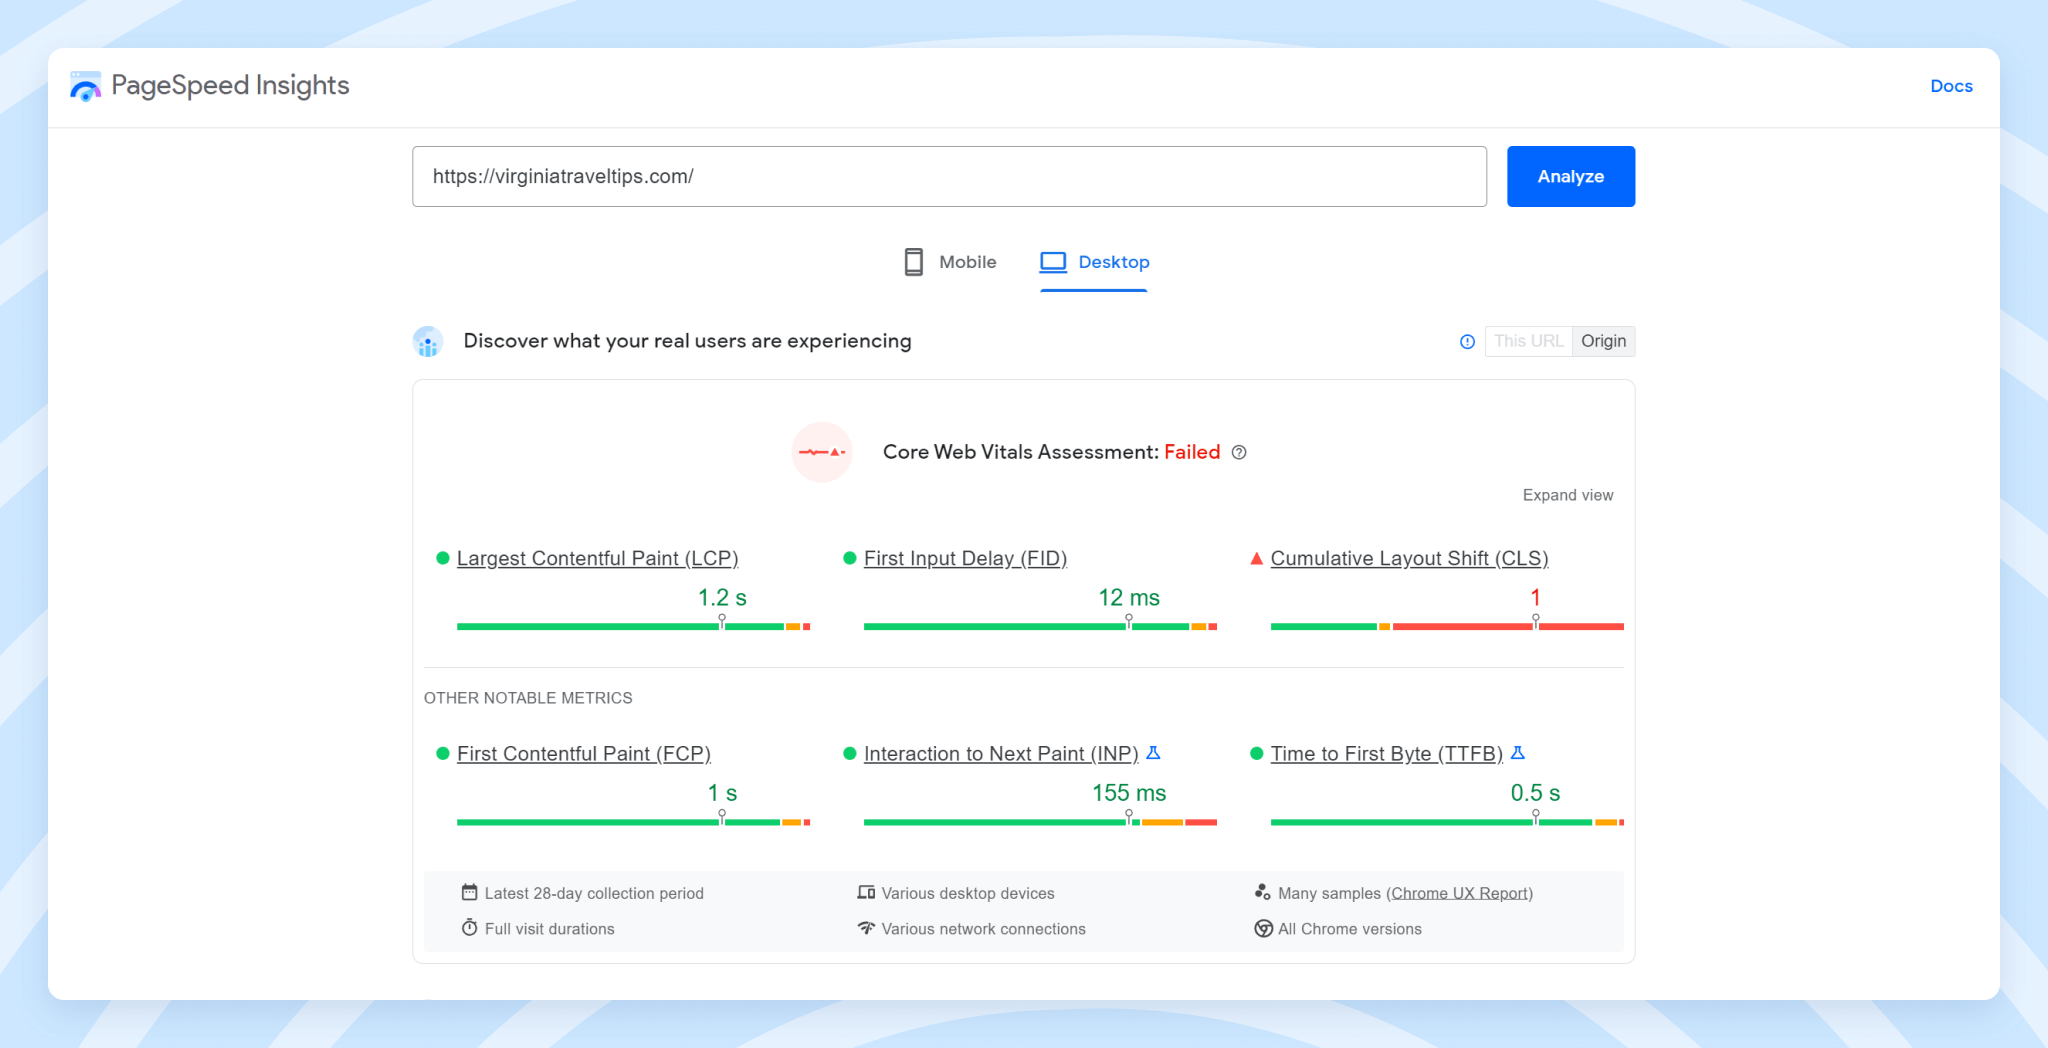
Website loading speed greatly affects your position in the mobile SERPs. Since in the US and many other countries more than half of all traffic comes from mobile devices, this should definitely be taken into account from day one of your blog’s existence. If you have difficulty speeding up your blog on your own, you can always contact professionals on platforms like Fiverr and UpWork.
Organic traffic does not grow quickly, but it is strategically correct to spend time and effort on this process. In the meantime, don’t forget about other traffic sources. Gain traffic from social networks from your group, make mailing lists, etc.
Step 9 – Monetize Your Travel Blog
As with attracting traffic, monetization is inextricably linked with all processes of blogging, so it doesn’t have to take place after content creation. In fact, you can work on monetization in parallel with creating your website or writing content.
The main ways travel bloggers make money:
- Selling goods and services from other companies and receiving a commission on each sale.
- Getting paid for impressions or clicks on an advertisement.
- Selling guest posts or links.
You can combine methods with each other or use only one. But with the last option (guest posts), it is important to be careful. Since Google may consider selling links as SERP manipulation, your blog may suffer (and even lose some traffic).
Affiliate Marketing
The first way to make money on your travel blog is by selling services and goods for a commission. This monetization method is called affiliate marketing and allows you to generate the maximum amount of income from your traffic. Affiliate marketing works like this:
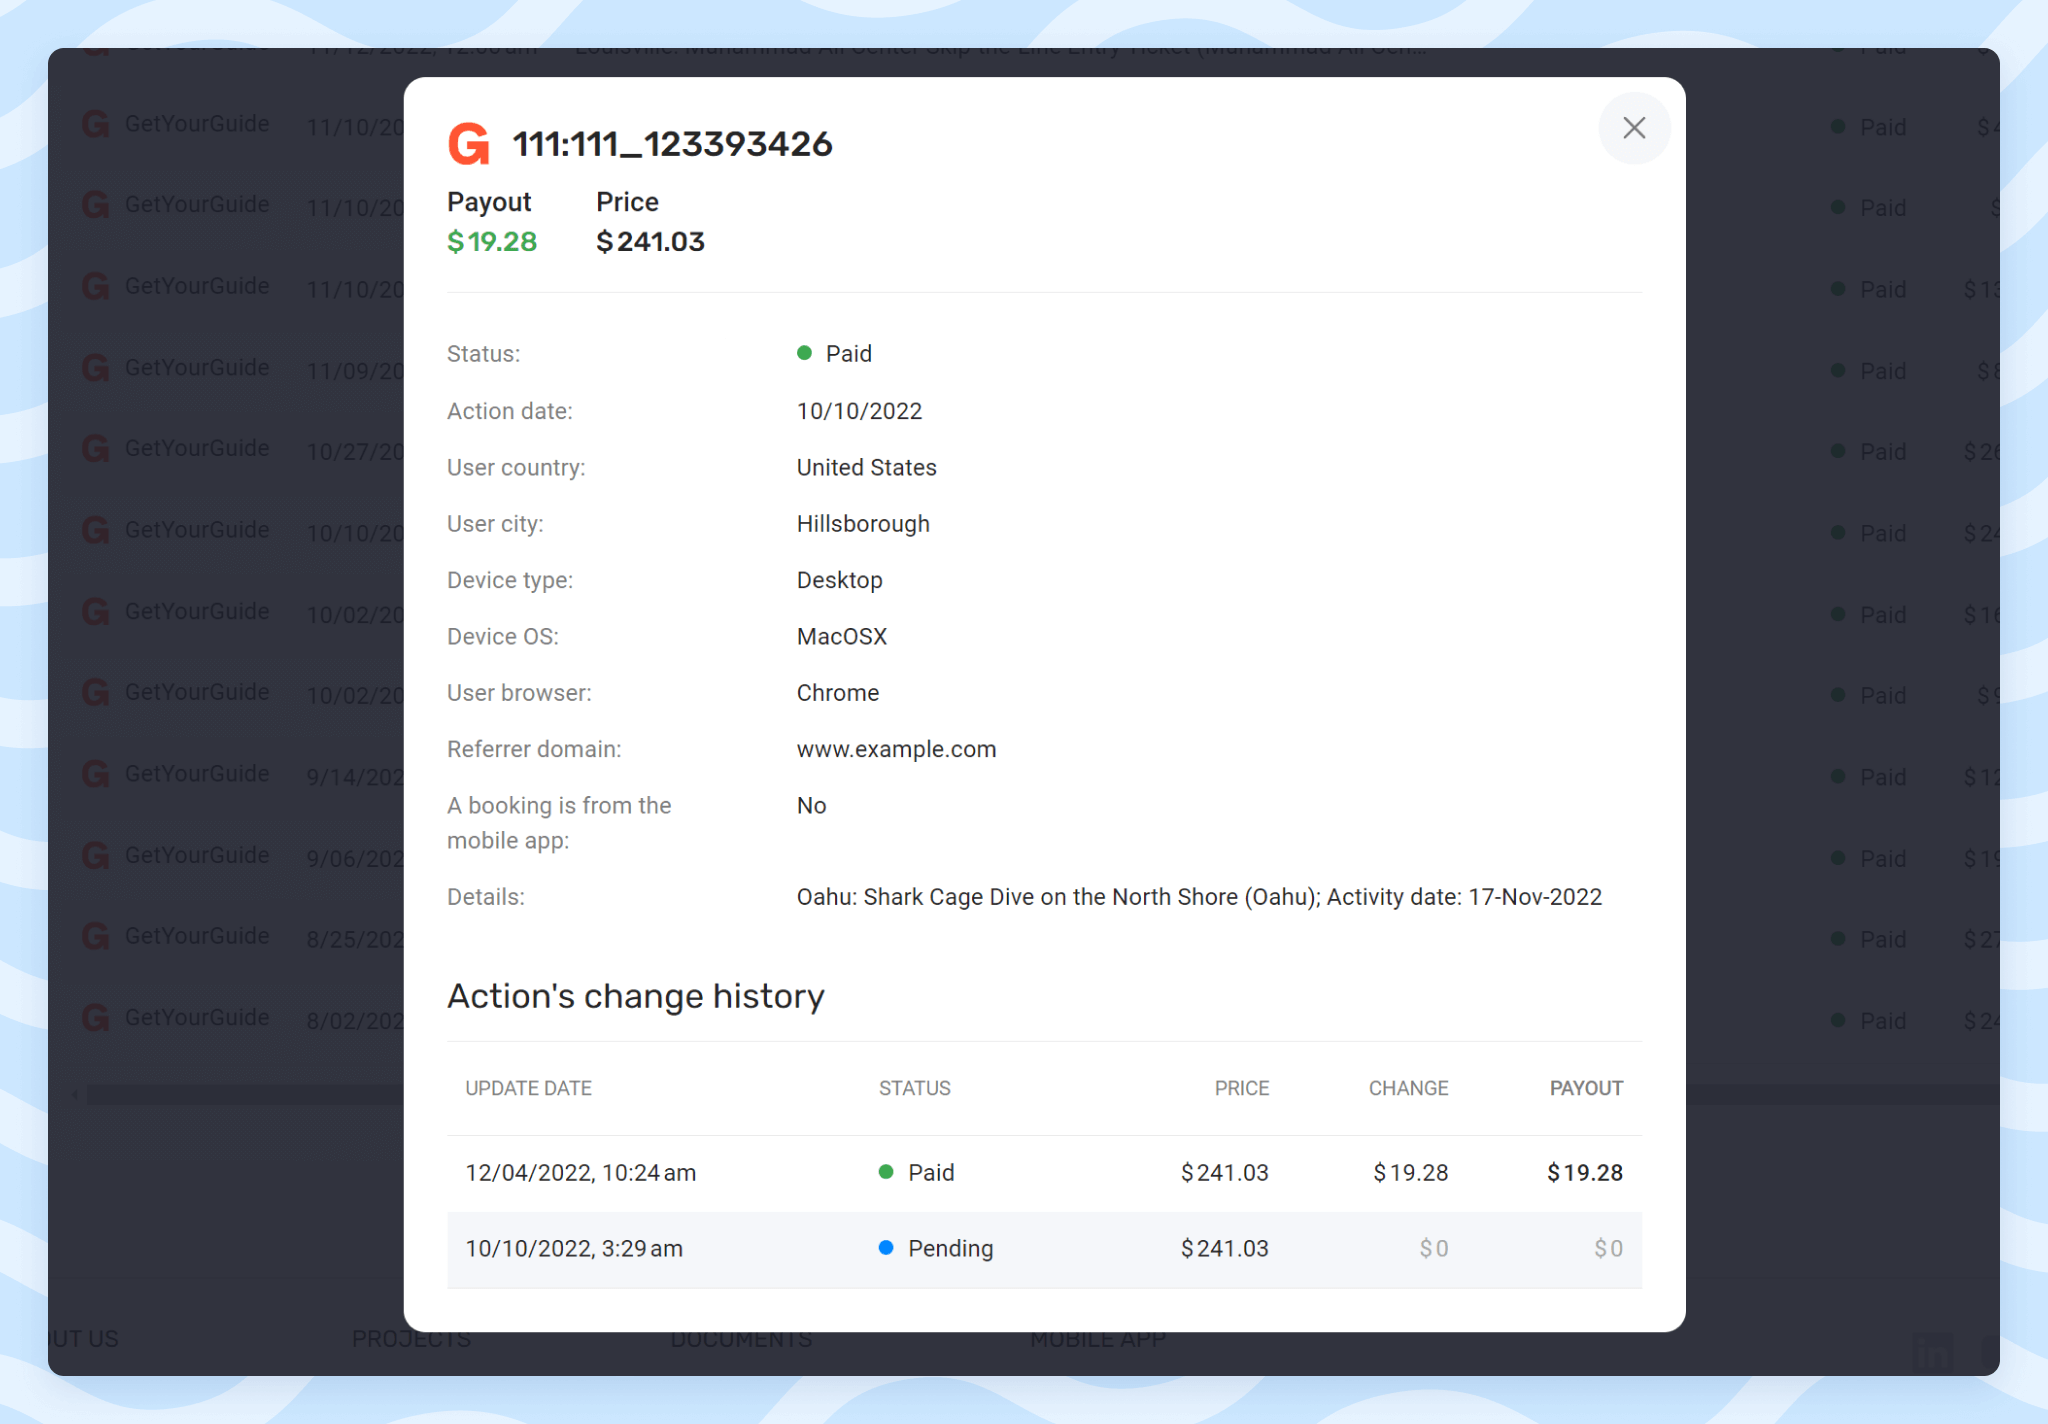
- You create an article where you internally recommend a service or product. For example, in an article about a day in Paris, you recommend a city tour offered through the GetYourGuide service.
- To drive traffic from your blog to the advertiser’s website, you place an affiliate link in your article that leads to GetYourGuide.
- Your audience reads the article on your blog and follows the affiliate links to the GetYourGuide website.
- If the person you referred makes a purchase from GetYourGuide, you receive income.
The upside of affiliate income is that advertisers (in this case, GetYourGuide) are willing to share a high commission with you because you refer customers with low risk for the brand to spend an advertising budget. For your audience, the price does not change in any way, and on the contrary, your audience receives a recommendation that solves their problem.
To make money from such recommendations, you need traffic – as brands only pay for sales that have been made. With that said, you can integrate recommendations into posts from the very beginning and then, with a set audience, receive income from previously published materials.
There are over 100 travel affiliate programs available on the Travelpayouts Partnership Platform and over 480,000 travel bloggers are already active. You can join the partnership platform without pre-moderation and gain access to dozens of brands at once, such as Booking.com, TripAdvisor, RentalCars, and dozens of others.
Join the Travelpayouts partnership platform
Join todaybrands
Advertising
The second way to make money on your travel blog is via advertising. You can place ads on your site through ad networks, such as AdSense, Mediavine, or Ezoic. In this case, there will be advertisements inside your articles that suit the interests of your audience.
The advantage of this method, as opposed to selling ads directly, is that you don’t have to look for advertisers. However, the downside is that you will earn income for clicks that is typically lower than income from sales. Getting paid for clicks could sound safer than the revenue-share model, because there are always more clicks than actual purchases. However, the revenue per sale is disproportionately higher, for example:
- From the sale of a tour for $100, you will receive $8-10. For each click on an advertisement for tours, you will receive an average of $0.20-0.40.
- This is also true for other travel products, including flight tickets, hotels, car rentals, etc.
You can also combine affiliate marketing and advertising (for example, by placing ads only in posts where you cannot offer the audience any service from brands).
Step 10 – Grow Your Blog
As previously mentioned, creating a travel blog is just the first step. Next, you have to develop your site:
- Create new content
- Update old content
- Experiment with content formats
- Improve monetization
- Improve the design of your blog
- Increase traffic
- And much more
Travel blogging is a long process that can definitely grow from a small hobby into a full-fledged source of income. Some bloggers start as a side hobby and then quit their day job and make five figures straight away. However, it’s rare for bloggers to achieve amazing results in such a short time, so you also need to be ready for a long game and work hard on blog development. If you do, you will definitely succeed.
Key Takeaways
Creating a travel blog and making money on it is definitely possible, but to do so, you will need to:
- Determine the topic of your future travel blog – Try to find a niche that works for you. Niche blogs often make it easier to achieve good results. Don’t narrow the topic too much, as you want to ensure that you will have a lot of growth potential in the future.
- Buy a domain – It is better to start right away with paid domains like .com or others. This will give you full control over your domain. To search for a free domain, you can use domain generators.
- Set up hosting – Your site must be located somewhere. To do so, order an initial tariff from a hosting company. Basic plans are enough for most new travel bloggers and can be expanded in the future.
- Install a CMS – If you don’t have specific requirements, you can immediately opt for WordPress.
- Design customization – Free pre-made themes for WordPress will suffice for the initial stage. You don’t need to design your own, but you can also (immediately or in the future) buy beautiful travel templates on sites like Themeforest.
- Prototype the structure of your future travel blog – Before you start creating content, consider the structure of your website. While it can be changed in the future, the basic structure is best thought out right away.
- Create content – Don’t put off creating content. It is better to publish an imperfect article than not to publish at all. When preparing articles, be sure to focus on what the audience is interested in (use tools such as SEMrush or KeySearch.co).
- Drive traffic – Organic traffic is likely to be your main source of traffic, as it is for most successful travel bloggers. To get more traffic from Google, write articles better than those of your competitors and manage the speed of your site as well as how many links from other sites appear on your blog.
- Make money on your blog – In most cases, you need the traffic for optimal monetization, but you can start thinking about monetization right away. You can earn a high income by recommending services and products from various brands. For example, by recommending flights, hotels, car rentals, or tours to your audience. With Travelpayouts, you will gain access to dozens of brands and earn up to 40% of the price of services.
- Grow your blog – Be prepared for long-term work. Your blog definitely has the potential to grow into a full-fledged source of income for you, but it will take time and effort.
We hope that our step-by-step instructions on how to start and monetize your travel blog have provided you with insight on how to become a blogger. If you have any questions, feel free to ask them in the comments.